
New camera, new settings
Lightroom’s Default Develop Settings:
If you are anything like me, then you have spent all too long wondering a couple of things about lightroom (I use version 2.6) regarding importing RAW files and the default settings that Lightroom applies to them before you begin working on editing them.
Firstly, I wondered how to change those default settings that Lightroom applies – for example, it always applies certain values to the Basic settings as follows:
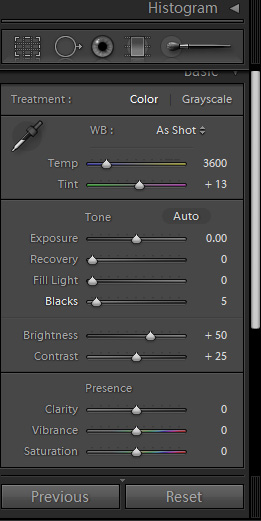
Note that the white balance is always defaulted to “As Shot†meaning it takes the setting from the RAW file each time.
Due to previous encounters with Lightroom’s messing with the white balance, I’ve found that the “As Shot” usually gives me the best result, as the camera itself does a better job (or even me) at figuring out the white balance than Lightroom does.
Camera Calibration:
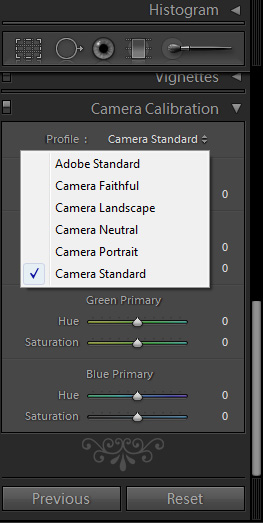
Now the second thing that I have been wondering is about camera calibration. Since I’ve seen my pictures having much more vivid colors after applying a camera-setting instead of the Adobe default, the regular setting is a camera standard for me. This setting gives you the opportunity to start off your editing with a particular colour/camera profile that is designed to look somewhat like what your camera would produce if you were using a picture style, such as Landscape or Portrait.
Lightroom automatically knows which camera your RAW file was generated in (and even the serial number!) and will give you the available options based on that. I believe you can download profiles from the Adobe web site, but for now I have stuck with the ones Lightroom already has.
The menu looks a little like this:
By selecting a camera profile for your image you are assigning it a new starting point from which you can perform any post production you wish. Note that this is not changing any of the Develop settings like Brightness, Contrast, Exposure etc. In fact I don’t really understand exactly what it is doing, but I do know that it produces a much more attractive image straight from the get-go.
Now the problem is that if you want to apply a camera profile to your images as you import them, you may have to think about creating a preset that can be applied on import… Something which is not exactly seamless…
So…
How to change your default develop settings and apply a camera profile automatically
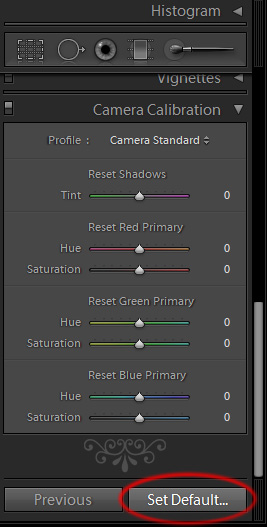
Starting with a freshly imported RAW file, choose a camera calibration profile of your liking. I went with a standard one as I’ve found out it gives me the best starting-point, and it only needs changing after careful examination of the picture itself. Next, make any adjustments to the develop module settings which you want to become the new default settings to be applied to all newly imported RAW files (and the settings to which the “Reset†option will revert back to).
Once you are happy with your settings, (here comes the lightbulb “aaaaahhhh†moment!!), press the ALT key and the reset button will turn into a “Set Default†button. Wow! Hidden feature!
On clicking “Set Default†you will be presented with a popup like this:
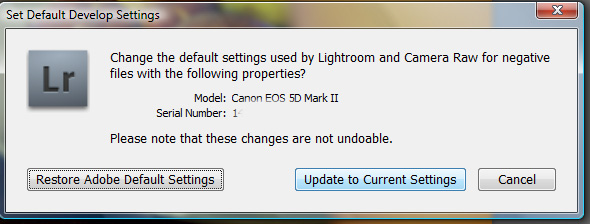
Next you should click “Update to Current Settingsâ€, then confirm your selection – and Voila!! Every RAW file you import from that camera from now on will have these new defaults. Magic!
Lightroom even understands the fact that you have two separate bodies, or even two bodies of the same type! My D40 and D90 both have associated default settings, which differ and are applied to the appripriate imports. More magic!
The thing is, I have seen this last popup before but never really understood what it was doing. You can find it in the menus but just by opening it in the way I have described it’s context somehow just makes more sense.
As this specific information is only traceable if you know about the fact that a standard setting can be applied upon import, I thought I’d share the info with you guys. Enjoy!
Disclaimer: Original post can be found here.